Thursday, February 2, 2017

CAS-ual Fridays Stamps Sneak Peek Day 2

Hello everyone!! Are you ready for another CAS-ual Fridays Stamps sneak peek? I know you are going to LOVE these two new stamps sets. I know I do!!

Today I am showcasing the new "Flower Power" and "Peace Out" stamp sets.

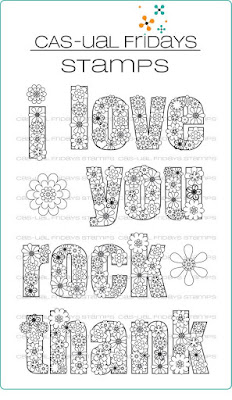
For my first card, I created a simple card using the "Flower Power" set.


To start off the card, I scored a 1/4" border around the edge of a piece of kraft card stock cut to a 4 1/4" by 5 1/2". I then stamped the word "love" using the "Flower Power" stamp set.


Next I did a bit of masking and stamped "i just" from yesterdays "Heartfelt Sayings" sneak peek set in black ink. I colored the little hearts above the letters with a red gel pen.


I mounted the panel onto a kraft, A2 sized card base. I then used foam adhesive to attach the "you" sentiment that I had stamped and heat embossed on black paper.


My last step was to adhere some red sequins to the card and use some red glitter glue in the center of the heart on the "o."

Here is a sneak peek of the whole set:


I plan to make bunch more of these to give away for Valentines day. It was such a fun and easy card to create!!

For my next card, I used the "Peace Out" stamp set and some Distress Ink smooshing to make a tie die card.


I stamped the "peace" sentiment from "Peace Out" with Versamark ink onto a piece of watercolor paper. I then heat embossed with fine white embossing powder.


Next I used four different shades of distress ink and swiped them over a piece of acetate in random areas. I spritzed water over the ink, picking up the acetate so the inks would drip into each other. I then placed the watercolor paper embossed side down and made sure the front was flat on the inked acetate so that the paper would pick up the ink. I LOVE how this came out. It really looks like a tie dye, which is the effect I was trying to get.


When the paper was dry, I adhered it over an A2 top folding card. My last step was to use some glitter glue randomly and in various colors over the middle of the flowers. I was in a hurry to photograph this and will say that the dots got smaller as they dried.

Here is a sneak peek of the full set:

Again, this set was so FUN to use and am going to try to create another tie dye card with the peace sign.

The "Flower Power" and the "Peace Out" stamp set will be available this Saturday, February 4, 2017 in the CAS-ual Fridays Stamp Store. If you use my code nora2017 you can get 15% off your complete order!!


Don't forget to hop on over the the CAS-ual Friday Stamps Blog to see what the other Girl Fridays have created!!

I thank you for stopping by today. Tomorrow there will be another sneak peek so be sure to check back in. Have a GREAT day!!


Supplies:
Stamps-CAS-ual Fridays Stamps "Heartfelt Sayings" and "Flower Power"
Paper-PTI Kraft, Black Bazzill
Ink-WPlus9 "Gala Red," Memento "Tuxedo Black" and Hero Arts "Unicorn White"
Other-Red Gel Pen, White Gel Pen, Stickles "Xmas," Sequins, MISTI, Ranger Multi-matte and Scrapbook Adhesive Foam Squares

Supplies:
Stamps-CAS-ual Fridays Stamps "Peace Out"
Paper-Canson Watercolor Paper, Recollections White
Ink-Versmark, Ranger Distress Ink "Mermaid Lagoon," "Salty Ocean," "Twisted Citron," and "Cracked Pistachio"
Stickles-"Diamond," "Peacock," "Firefly," "Seaglass," "Turquoise," "Frozen," and "Seafoam"
Other-Ranger Fine White Embossing Powder, Wagner Heat Gun, acetate

Wednesday, February 1, 2017

CAS-ual Fridays February Stamp Sneak Peek Day 1

Happy Hump Day!! I hope everyone is having a FABULOUS Wednesday.

What better way to celebrate the middle of the week with a sneak peek to the new release from CAS-ual Fridays Stamps! Today I am sharing two projects I created with two new stamp sets-"Special Delivery" and "Heartfelt Sayings."

On my first card, I used the mailbox in "Special Delivery" as the main focus for my card. This mail box can be die cut with the previous released "Mailbox Fri-dies."


To start off my card I stamped the mailbox, the envelope and the the mailbox front again from the CAS-ual Fridays Stamps "Special Delivery" set onto white card stock and colored the images in with Copic markers. I then added glitter glue and crystal drops in various colors over the middle of each flower on the mail box.


While these elements were was drying, I die cut two rectangles, one out of white card stock and one out of patterned paper. Over the card stock I lightly blended green and blue dye ink to create the illusion of grass and sky. I then stamped a sentiment from "Special Delivery" in black ink. I adhered both rectangles to a pink A2 top folding card. I tucked a pink circle under the inked panel.


It was time to die cut the mail box out that I had stamped and the little black flag. The mail box was a little too tall for my rectangle so I cut a bit off the bottom. I also used a craft knife to cut a slit in the left side of the mailbox front and slipped the stamped letter that I had fussy cut.


I adhered the black flag to the mailbox and added a rhinestone to give it a more shine. The last step was to pop up the lid of the mail box that I had created using foam adhesive. 

Here is a sneak peek of the whole set. Don't you just love the little hearts in the sentiments?


I had so much fun coloring and will be making another project with this mailbox soon.

For my second project, I combined the "Special Delivery" and the new "Heartfelt Sayings" stamp set. The sentiments in the "Heartfelt Sayings" stamp set have little hearts in them too!


I began the card by stamping the envelope from the CAS-ual Fridays Stamps "Special Delivery" set repeatedly onto a piece of white card stock with black dye ink. To make the envelopes look as if they were overlapping, I did a bit of masking. Next I stamped some little hearts randomly around the front.


I stamped the sentiment using the "Heartfelt Sayings" set and used my Copic markers to color everything in. I went over the hearts with a clear sparkle pen and then added some Glossy Accents over the top to give all the hearts a little more oomph.


Once the card front dried, I used a double cut frame to die cut it. I adhered the outside of the frame to a white A2 sized, top folding card.


I then used foam adhesive to the middle panel and placed it into the frame. I love the dimension it gives the card.


I have to say that this is my FAVORITE card that I created for this whole release and will be doing some others with the "Heartfelt Sayings" sentiment set.

The stamps will be in the CAS-ual Fridays Stamp store starting on Saturday, February 4, 2017. Please use my code nora2017 to get a 15% discount on your total order.


I thank you for stopping by today. Check back in tomorrow for the debut of two more new stamp sets.
Have a wonderful day!!


Supplies:
Stamps-CAS-ual Fridays Stamps "Special Delivery"
Dies-CAS-ual Fridays Stamps "Mailbox Fri-die"
Ink-Memento "Tuxedo Black," Hero Arts "Soft Pool" and "Green Hills" dye ink
Paper-PTI "Sweet Blush", Recollections "White," Neenah Solar White, Echo Park (checked), Black Bazzil and Basic Grey (circle)
Stickles- "Cotton Candy," "Glam Pink," and "Diamond"
Nuvo-"Rosewater," "Gloss Bubblegum," "Blush" and "Gloss White"
Other-Big Shot Machine, Spectrum Noir "Clear" Sparkle Marker, Glossy Accents, Rhinestone and Scrapbook Adhesives Foam, Ranger Ink Blender tool


    Supplies:
     Stamps-CAS-ual Fridays Stamps "Heartfelt Sayings" and "Special
     Delivery"
     Dies-SSS "Stitched Rectangles"
     Paper-Neenah Solar White
     Other-Big Shot Machine, Copic Markers, Spectrum Noir "Clear" Sparkle
     Marker, Glossy Accents, Memento "Tuxedo Black" dye ink

Tuesday, January 31, 2017

Some Cards from the January ScrapJazz Card Kit Club

Hello everyone!! I hope you are all having a great day. We had an early dismissal due to snow and I could not have been happier. My new semester schedule is taking a little while to get used to so short days are acceptable right now.

Today I am sharing some cards I created using the kit Claudia sent us.


She sent us so much stuff that I could have made about 20 cards!! However, I only managed to find time to create five.


I used the flower as a mask to make the background and then layered the rose over the die cut bases that I inked with Distress ink in a couple colors.


Used a stamp from PTI to create the sentiment on this card. I die cut some of the paper Claudia sent and used the fun fiber to give the card a bit of oomph. I also used Stickles and some Glossy Accents on the present.


I used Distress Ink and Glossy Accents to jazz up the rose on this card. CASEd a design for this card from Pinterest.


I used the other side of the patterned paper from the card above. This time instead of the present, I added the die cut flowers, the scroll and a bit of ribbon from Claudia's kit.


This was the first card I created. I used a pre-made polka dot card for the base. I layered the orange paper strips, the border and the chipboard over it to make this easy card.

I like using supplies that others give us. Sometimes it is hard to figure how how to use them but eventually I get an idea.

I thank you for stopping by today. Have a fabulous night!!


Tuesday, January 24, 2017

Snow Day and an entry for Tag You're It Challenge #63

Hello everyone! I hope you all had a fabulous day. I know I did. There was a snow day for us. Really it was ice but I will take the day off any way I can get it!! I was able to sleep in, do a bunch of laundry, work out a decent hour and have some time in my scrap room. I think it was a successful day all around.

Have not been here since the weekend either. Wanted to let you know our concert was fantastic. So different then when I was a kid. It was more then a concert but rather a SHOW. Computer Graphics, video, different stages-just so much fun.

Today I FINALLY finished my entry for the Tag You're It Challenge #63. I have had all the pieces on my desk since Sunday and just never put it all together.


My darling daughter came in to my room today and told me it looked like something you could buy in a store. That made me feel good!!

Here is the inspiration piece for the challenge:


My inspiration from the photo was the white tag and frame, the shaded background (though I did mine in pink) and using an animal like Karin did on her tag.

I started off by making a folded bag using a piece of 11" by 3" piece of pink card stock.


I then used Simon Says Stamp! A2 Card Curved Edge die to make a curve at the top of the card stock.


I then used my scoring tool and scored the card stock the long way at 4", 5 1/4" and then at 9 1/2".


I folded the bag up, inserted a little glassine bag of candy and adhered the bag together.


I then tied my tag on the bag which I created by using My Favorite Things Die-namics Blueprints #4
and their Die-namics Stitched Circle Frames. I shaded inside of the circle with Ranger Picked Raspberry Distress Ink and then used 3L Scrapbook 3D Adhesive Foam Squares to pop the circle frame over the tag.


I stamped and die cut my little panda with Memento “Tuxedo Black” using Mama Elephant's Incoming Mail stamp set and matching die. I colored the image in using Copic Markers and added some Spectrum Noir Clear Sparkle Marker over the top. To make the hearts stand out, I covered the red hearts in with Ranger Christmas Red Stickles and used Glossy Accents over the top of the. I also added some tiny google eyes.


When the bear was dry, I adhered it to the tag. It still needed something so I added two hearts that I die cut using Simon Says Stamp! Mini Hearts Craft Dies. I adhered them so they overlapped the box and covered them with Stickles and Glossy Accents to match the hearts in the box.

My last step was to tie the tag to the little bag and I was done!! The little bag took me about five minutes to make so I could see me doing a bunch to give away this year.

I am also entering this into Simon Says Stamp Wednesday Challenge "Everything But a Card" and Darnell's "NBUS Challenge #9." I have had this stamp set for months and have never inked it up!!


I thank you for taking the time to stop by!! Have a FABULOUS Wednesday!!


SaveSave

Saturday, January 21, 2017

Merry Monday #231

Helllooo Friends!! I hope everyone is enjoying their day. I am preparing for my first Twenty One Pilots Concert tonight. It is a belated birthday gift for Charlotte's sixteenth birthday. I have not been to a concert in YEARS and this is probably not the band I would have chosen. However, I do like them and it will be fun to be with my husband and Charlotte.

Today I am popping in to showcase a card I created for the "Merry Monday Challenge #231."


The challenge was to create a card with a reindeer on it. I have many reindeer stamps but decided I would use one that I had from CC Designs. Isn't he cute? (it could be a girl but I think of this one as a he.)


The background was sent to me by Michele Ferguson in the Christmas Card she sent me. I had to use it on a card. I NEED to find this embossing folder because I adore it.


I layered a tag from My Minds Eye under the reindeer panel. I just received the "Merry" die by Sunny Studios and I HAD to use it on a card. I was eyeing a ton of fun cards with it over Christmas and bought it in one of my buying frenzies after the holiday. The "& bright" is an oldie but goodie from PaperTrey Ink's "Tremendous Treats" set.


It is hard to tell but the nose and the bell I layered with Spectrum Noir Clear Sparkle and then covered in Glossy Accents. I also added some sparkle to the antlers.


I am entering this into Darnell's NBUS Challenge #8. She had an optional use colored pencils on kraft but I have already done this technique many times.


I am also joining Happy Little Stampers Christmas Challenge-Anything Goes.


I thank you for stopping today. Have a FABULOUS Saturday!!


Supplies:
Stamps-CC Designs, PaperTrey Ink "Tremendous Treats"
Dies-Sunny Sudio's "Merry," Lil' Inkers Designs
Paper-PaperTrey Ink "Pure Poppy," Bazzill "Licorice," Neenah Solar White, We R Memory Keepers White Out Collection "Christmas-Party"
Ink-Memento "Tuxedo Black," Hero Arts "Unicorn White"
Pens/Markers-Spectrum Noir Clear Sparkle Marker, Copic Markers, White Gel Pen
Other-My Minds Eye Comfort and Joy Tags, Glossy Accents, Foam Adhesive, Big Shot, Wagner Heat Gun, Ranger Fine White Embossing Powder